Showing posts with label sculpture. Show all posts

Thursday, August 10, 2023

Hoggle from the Labyrinth

 Well, it's been a long time since I've posted anything.  I forgot all about this blog.  So, here's a 4" Xmas ornament sculptured in Sculpey and painted in oils of Hoggle the goblin from Jim Henson's movie "The Labyrinth".  There are a zillion, (yes, one zillion, I counted), pipes, keys and pouches on his utility belt.  I crossed his arms to cover many of them so I didn't have to sculpt them, but I noticed he has a severed hand instead of a rabbits foot, and it is making the devil horns sign.  What was Jim telling us?  His vest has a face on the back too, and I suppose it symbolizes that he is two-faced.  He does betray the girl Shara a few times.  Anyway, this is for my daughter Jenah.  She has an obsession with the Goblin King...


Thursday, September 03, 2020

Another View Master Artist


I never know who or when someone is looking at this blog, I don’t tend it every day or give it much attention, but it’s been a great way of learning things!

Just recently, a comment on one of my View Master posts led to the discovery of a new artist who worked on translating my favorite cartoon characters into 3d sculptures for the View Master reels. 

Meet Martha Armstrong Hand who, I can only conclude, worked around the same time as the already mentioned Florence Thomas and Joe Liptak.  There seems to be some confusion between Martha and Florence on who is who when it come to the photos, and I am thinking some got miss labeled as Florence when they should have been Martha.  Regardless, we have more information on Martha, and learn which View Masters she actually worked on plus learning of  her career as a doll designer for Mattel Toys!

Read more about Martha Armstrong Hand here: https://www.niada.org/portfolio/martha-armstrong-hand/


Special thanks to Lori for sending this article!


                                                               Martha Armstrong Hand


Monday, November 24, 2014

The Artist's Work Space


Fellow blogger, and animation artist, Eddie Fitzgerald has recently posted on his inspirational “Uncle Eddie’s Theory Corner”, an article about artists work spaces, (link provided here: http://uncleeddiestheorycorner.blogspot.com/), which I liked very much and responded to.  He offered an invitation for me to show my space if I cared to, so here it goes.

As I mentioned my wife hates clutter because her mother was a messy artist, and she had to clean the house around her moms work area, which also spilled over into their living space.  Well, my mother was a messy artist as well, and we lived in what she called 'creative clutter', which I loved! 

Wanting to keep a happy wife and an inspirational environment,  we have managed a pretty good compromise.  I can’t show you our entire house, which is an eclectic mix of styles and cultures, but I can show my work spaces and touch on a little of how I work and what inspires me.

My office is pretty digitally oriented for computer animation and this over-view picture kind of shows the contained chaos.  I have my messy bookshelf, walls of pictures, musical instruments and my sculptures and toys.  Some of the details are an unfinished portrait of my daughter begun by my late mother, which hangs above my desk, and a picture of my brother in period clothing that mom did, on another wall.  I also have paintings my mother-in-law did, and our mothers’ works are hung through out our house.

Downstairs I have a man cave with all my toys put in a wet bar, and movie posters on the walls.  This leads to my other work desk reserved for messy things like sculpture, or painting.  We have a cement floor in this part as it is also the laundry room, so I can drops brushes or cast plaster molds if I want. 

There it is.  I’m very thankful for what I have.  Hope you all have a great Thanksgiving!  


Daughter by my mother
Brother in period costume by my mother
Wind chime (hung inside)


Another wall hanging
Shelve in office, (note the Vinton box for floppy disks!)
Rug hung on wall
Wall hanging
Book case with sculptures I've done


Wet bar with collectable toys (sorry about the glare)


Basement desk for messy work, (portrait of grand-kids on easel started for Christmas, don't tell!)

Sunday, September 07, 2014

Stop Motion in the Digital Age No.02

Since animation is a series of still images with slight changes made to achieve motion, the idea of replacing the object altogether came very early in stop motion history.  The process was termed 'replacement animation'.

Today, technology has allowed Laika Studios to push the bounds of rapid prototyping, 3-D-printing all of the puppets' faces in color. 

Who first used the replacement technique is lost to time but George Pal began making his “Puppetoons” series in 1932 and used a method of planning action as a traditionally drawn animation and then carving entire figures in wood which were replaced for each frame of motion based on the 2D drawings!

Here’s a lovely video that tells Pals story better than I can.


George Pal surrounded by his puppet replacements

A walk cycle from George Pal
Whole head replacements by George Pal
 
Later, instead of replacing the entire figure, just the faces were replacements and the bodies were the traditional ball and socket armatures still used today.  This 1935 film, “Hector the Pup” by John Burton is a fun use of mouth replacement:

 
Laika Studio has taken the replacements to a new level using computers to build models and printing them out in color as hard copies.  Although brittle, there is the advantage of making multiple copies for teams of animators.  They also move more smoothly than the chatter seen in older replacements.

Digital sculptures printed out in color from "Paranorman"
Check out these great expressions on a set of whole face replacements from the up and coming “Boxtrolls” soon to be released this September.
Digital sculptures printed out in color from "The Boxtrolls"
Update:  Here's a dandy article on how Laika has made stop-motion relevant today: http://www.wired.com/2014/09/travis-knight-stop-motion-boxtrolls/#slide-id-1417381

Sunday, June 29, 2014

Digital Scuplting Beatles

I've started exploring digital sculpting and feel like I'm late to the table where it's concerned.  There are so many splendidly talented artists using the latest technologies and having wonderfully photo-real looking results that I'm completely intimidated by the whole thing.

To put things in perspective I've seen the evolution of computer graphics and the rapid increase in what one can do today as opposed to way back then.  I recall the method of sculpting a mesh was either with 'nurbs' or 'polygons' and I never fully mastered either one.  Now there are programs with names like Mudbox and ZBrush that can give you the most remarkable digital sculptures.

There is a whole new set of tools to learn and hoops to jump through.  I'm approaching this like a hobbyist and not ever thinking of doing this professionally.     

Here are some meager first attempts of mine.  That's supposed to be John Lennon in the later years and Paul in the early years.  Neither one is finished yet but I'm learning things along the way.


UPDATE:  Here's another whack at Sir Paul.


Sunday, June 22, 2014

Delightful Designs

Hello, anybody out there?  Wow, it's been a long time between posts but I just haven't felt the desire till now.
Check out these sculptures by French artist Gilbert Legrand as he lets his active imagination soar by painting small details onto these everyday objects to help us see them the way he does. With the addition of a face and maybe some arms and legs, a paintbrush can become a mangled fox, a hinge can become a shady salesman, and a juicer becomes a woman emerging from a pool.

I find these incredibly inspiring and they remind me of a game my sister and I would play where one of us would draw a scribble and it was up to the other to make something from it.

Somewhere I blogged about seeing things, (it may be called Seeing Things), in the woodwork of a door or pattern in a tabletop.  This is a great extension of that idea and I plan to use it if I'm stumped for character designs.  


Tuesday, May 07, 2013

RIP Ray Harryhausen

Well it finally happened.  Today we lost another pioneer of animation, Ray Harryhausen.  Without his contribution to stop motion we would have never grown up with the wonder and magic of his films.  He saw the media as a way of realizing classic mythology and combining supernatural creatures with live action.

His films crossed age barriers and generations appealing to both young and old.  His inspiration bred a new generation of artists in stop motion and computer animation.  We owe a tremendous debt to Mr. Harryhausen and I'm glad he saw some return of affection and appreciation by throngs of admiring fans before he passed.  Thanks for all the dreams and wonder, Ray.


Monday, January 21, 2013

Carving the Comics


Here's a link to these great sculptures by Charles Ponstingl.

http://melbirnkrant.com/carving/index.html

The site was put together by Mel Birnkrant and tells the story of  how Charles came to do what he does.  There are many interesting pictures so be sure to check them out   I personally would love to one or two or more of these.

Friday, September 14, 2012

Tiny Art

Sometimes I see things that blow my mind. Here is a guy, Willard Wigan, who sculpts pieces so small they fit into the eye of a needle. He sells these things for unbelievable amounts of money. What blows my mind is that he can do it and that people have the money to buy them.
Check out his gallery and the videos on him here:

 http://www.willard-wigan.com/

 http://www.bbc.co.uk/search?q=willard%20wigan%20mbe


Monday, May 09, 2011

Piggy Bank

I'm doing a ceramic bank for a friend. This is the design I came up with. Maybe I'll post the finished sculpt later.

Click on image to enlarge

Sunday, November 14, 2010

Missed History

Today, thirty-one years after its original release, Will Vinton’s now classic and award-winning animation of “The Little Prince” was presented at the Hollywood Theater with some of the original voice cast members reprising their roles live, along with sound effects artists and live music.

I couldn't make it but I dearly would have loved to. After 13 years with the Will Vinton Studios it would have been wonderful to talk once again with these gifted, creative people.

Megan Kahrs, another former employee, was there and posted some pictures on facebook which I'm using without her permission.

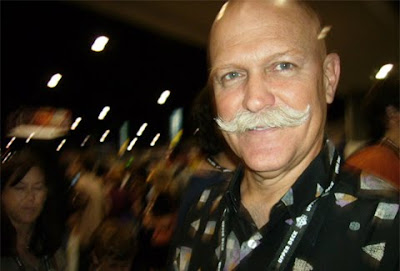
The middle picture starting with the mustachioed Mr. Vinton on the left, includes Joan Gratz, who won her own Oscar for the claypainted "Mona Lisa Descending a Staircase", and master animator/director Barry Bruce who defined the look of Claymation.

If you've never seen "The Little Prince & Rip Van Winkle" or "The Adventures of Mark Twain" they are available here: http://willvinton.net/filmDistribution.htm

This blog is peppered with postings on Will Vinton, Joan Gratz, and Barry Bruce if you're interested.

Friday, August 06, 2010

Claymation tools

Will Vinton

A fellow animator was asking how certain things were accomplished at Will Vinton's Claymation Studio. Here is a paraphrased version of the questions and answers.

Q: When you join pieces together, how do you erase (blend) the seams? Especially when reaching across a crowded set to get access to the puppet at a 45 degree angle.

A: You might want to consider ways of gaining access to your characters so you don't have to bend in unnatural ways. If you can pin register props like tables and chairs you can remove them and get to your figures and then replace them for the shot. I've had walls on hinges that swung out of the way so I could get to characters. If a character is seen from the waist up or never walks or is seated, we sometimes mounted them on a square platform and registered them with 'L' brackets screws to the floor. We lift the thing out and drop it back into the brackets.

Q: What kind of tooling technique is used to get that mottled/carved wood look? Gairy Bialke was probably best known for that style. It looks awesome, especially on arms and legs.

A: The chiseled look to some Claymation probably started with Barry Bruce who used what became known as a Barry Stick. It has a flat surface with a blade on one side and a round edge too. We made our own custom tools in the wood shop and a variation made by Jeff Mulcaster became my favorite tool. It's small and extremely versatile. (See diagram)
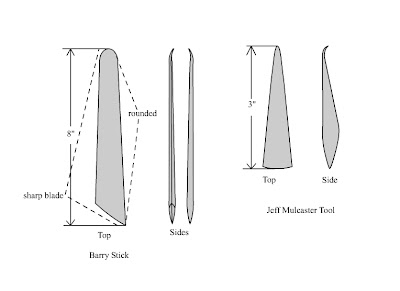
Click Image to Enlarge

Basically the flat side was used to spread the clay, kind of like frosting a cake. We were using the soft Van Aken and the flat tool side also was used to block out the shapes giving you that carved kind of look. The sharp blade created creases and the round side was used to smooth and blend . The curving tip was used for prying open spaces, smoothing and detailing, and on the Mulcaster tool it was great for detailing small areas.

Q: In EB's mustache at the end of Claymation Easter, how was it modified from fame to frame to appear as though the lines were bending (looks almost like morphing or deforming, but the lines would have to be re-scribed, and it doesn't look like they are).
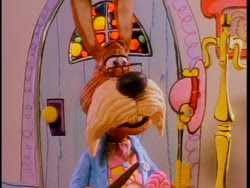


A: The mustaches were clay replacements you could bend and shape so they looked like they were morphing until you replaced it with the shape you wanted. We has a mold to make copies.

Q: How was the lip sync done on the Raisins? This is probably my biggest question because I can't tell if it was completely torn apart and re-sculpted every frame, or if it was a single expression being re-worked frame to frame. Even with live action reference, I would have trouble with some of those mouth shapes. It's incredibly fluid.

A: The lip sync was done using live action reference of the actors preforming their lines. We all had Moviolas at our sets and tried to match the lip shapes the best we could. Generally the mouth was carved out leaving a cave from cheek to cheek and nose to chin which was lined with black clay. The mouth was built up using rolls of flesh colored clay spiraled around the edges of cave until you got the mouth size you wanted. Then you smoothed out the spiral and added the lip details. If you were very careful and remembered where your cave was you could cut these mouth shapes out and use them again like replacements.