 Will Vinton
A fellow animator was asking how certain things were accomplished at Will Vinton's Claymation Studio. Here is a paraphrased version of the questions and answers.
Q: When you join pieces together, how do you erase (blend) the seams? Especially when reaching across a crowded set to get access to the puppet at a 45 degree angle.
A: You might want to consider ways of gaining access to your characters so you don't have to bend in unnatural ways. If you can pin register props like tables and chairs you can remove them and get to your figures and then replace them for the shot. I've had walls on hinges that swung out of the way so I could get to characters. If a character is seen from the waist up or never walks or is seated, we sometimes mounted them on a square platform and registered them with 'L' brackets screws to the floor. We lift the thing out and drop it back into the brackets.
Q: What kind of tooling technique is used to get that mottled/carved wood look? Gairy Bialke was probably best known for that style. It looks awesome, especially on arms and legs.
A: The chiseled look to some Claymation probably started with Barry Bruce who used what became known as a Barry Stick. It has a flat surface with a blade on one side and a round edge too. We made our own custom tools in the wood shop and a variation made by Jeff Mulcaster became my favorite tool. It's small and extremely versatile. (See diagram)
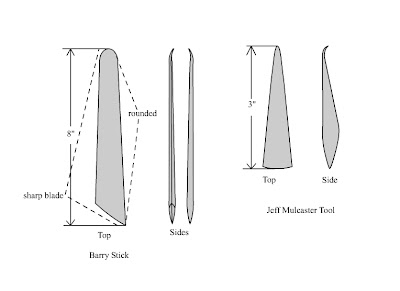 Click Image to Enlarge
Basically the flat side was used to spread the clay, kind of like frosting a cake. We were using the soft Van Aken and the flat tool side also was used to block out the shapes giving you that carved kind of look. The sharp blade created creases and the round side was used to smooth and blend . The curving tip was used for prying open spaces, smoothing and detailing, and on the Mulcaster tool it was great for detailing small areas.
Q: In EB's mustache at the end of Claymation Easter, how was it modified from fame to frame to appear as though the lines were bending (looks almost like morphing or deforming, but the lines would have to be re-scribed, and it doesn't look like they are).
A: The mustaches were clay replacements you could bend and shape so they looked like they were morphing until you replaced it with the shape you wanted. We has a mold to make copies.
Q: How was the lip sync done on the Raisins? This is probably my biggest question because I can't tell if it was completely torn apart and re-sculpted every frame, or if it was a single expression being re-worked frame to frame. Even with live action reference, I would have trouble with some of those mouth shapes. It's incredibly fluid.
A: The lip sync was done using live action reference of the actors preforming their lines. We all had Moviolas at our sets and tried to match the lip shapes the best we could. Generally the mouth was carved out leaving a cave from cheek to cheek and nose to chin which was lined with black clay. The mouth was built up using rolls of flesh colored clay spiraled around the edges of cave until you got the mouth size you wanted. Then you smoothed out the spiral and added the lip details. If you were very careful and remembered where your cave was you could cut these mouth shapes out and use them again like replacements.