 Will Vinton
A fellow animator was asking how certain things were accomplished at Will Vinton's Claymation Studio. Here is a paraphrased version of the questions and answers.
Q: When you join pieces together, how do you erase (blend) the seams? Especially when reaching across a crowded set to get access to the puppet at a 45 degree angle.
A: You might want to consider ways of gaining access to your characters so you don't have to bend in unnatural ways. If you can pin register props like tables and chairs you can remove them and get to your figures and then replace them for the shot. I've had walls on hinges that swung out of the way so I could get to characters. If a character is seen from the waist up or never walks or is seated, we sometimes mounted them on a square platform and registered them with 'L' brackets screws to the floor. We lift the thing out and drop it back into the brackets.
Q: What kind of tooling technique is used to get that mottled/carved wood look? Gairy Bialke was probably best known for that style. It looks awesome, especially on arms and legs.
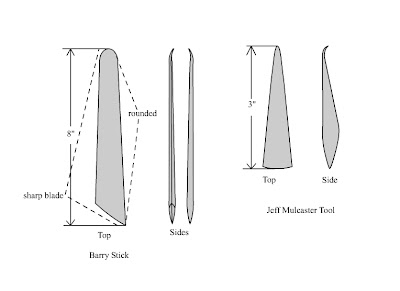
A: The chiseled look to some Claymation probably started with Barry Bruce who used what became known as a Barry Stick. It has a flat surface with a blade on one side and a round edge too. We made our own custom tools in the wood shop and a variation made by Jeff Mulcaster became my favorite tool. It's small and extremely versatile. (See diagram)
 Click Image to Enlarge
Basically the flat side was used to spread the clay, kind of like frosting a cake. We were using the soft Van Aken and the flat tool side also was used to block out the shapes giving you that carved kind of look. The sharp blade created creases and the round side was used to smooth and blend . The curving tip was used for prying open spaces, smoothing and detailing, and on the Mulcaster tool it was great for detailing small areas.
Q: In EB's mustache at the end of Claymation Easter, how was it modified from fame to frame to appear as though the lines were bending (looks almost like morphing or deforming, but the lines would have to be re-scribed, and it doesn't look like they are).

A: The mustaches were clay replacements you could bend and shape so they looked like they were morphing until you replaced it with the shape you wanted. We has a mold to make copies.
Q: How was the lip sync done on the Raisins? This is probably my biggest question because I can't tell if it was completely torn apart and re-sculpted every frame, or if it was a single expression being re-worked frame to frame. Even with live action reference, I would have trouble with some of those mouth shapes. It's incredibly fluid.
A: The lip sync was done using live action reference of the actors preforming their lines. We all had Moviolas at our sets and tried to match the lip shapes the best we could. Generally the mouth was carved out leaving a cave from cheek to cheek and nose to chin which was lined with black clay. The mouth was built up using rolls of flesh colored clay spiraled around the edges of cave until you got the mouth size you wanted. Then you smoothed out the spiral and added the lip details. If you were very careful and remembered where your cave was you could cut these mouth shapes out and use them again like replacements.
6 comments:
Hey, Joel! How you been?
I'm taking the Claymation class with Will Vinton this quarter and when Barry came to guest teach yesterday, I remembered this post.
He went over what you said here almost verbatim in class and gave us a hands-on demonstration after critiquing our homework clips. It was a big "ah-haaaa..." moment! I guess sometimes you have to see something in action in order to fully understand how it works. Or maybe I'm just a visual person and learn/remember best that way. We haven't covered lip sync yet, but that's coming in the next few weeks. This week's homework is a 300 frame metamorphosis. The class is pretty intense, blink-and-you miss it kind of thing, but I've been furiously jotting down notes, trying to get it all on paper before I forget anything.
The quality of my sculpting and animation have really jumped since I started the class. Storytelling skills, as well, not to mention lighting. I can't wait to put up more exercises, but if you want to see the progress, I'm posting weekly clips over at prammavenTV on Youtube.
Best wishes,
Don Carlson
Hey Don,
Good to hear from you and that you're doing well.
I have a tip for you about morphs. Say you're morphing a cat into a dog. Build your cat and dog models as two separate sculpts, then modify your first sculpt single frame until it resembles your end sculpt and then just replace it with your finished second sculpt. Easy Peesy!
Thanks for checking in and take care!
Thanks for the morphing tip! I just finished calculating the number of frames needed to get from morph A to B to C (with one second holds) It was about 75 frames of metamorphosis to the first shape, hold 1 second, etc. Was it common to spend that many frames on the transition, or would you do less? As it stands, that's about 3 seconds of nothing but the morophing stage between sculptures.
A story must be told throughout so there's still some things to figure in, plus what objects to morph into, but this is my favorite assignment so far.
Hi Don, Like any scene, the action and timing were in the service of the story so there really isn't a fixed time allotted to morphs. In your instance your assignment required you to do so many frames of this and so many of that. We did shot most everything on 'twos' which cut down on the sculpting.
I'm glad you're enjoying the classes! Please say hello from me.
Thanks for the help on the assignment! It went much better than I expected, aside from a camera bump (attempted to correct in post) and a weak arm wire because I didn't calculate the weight of the clay and epoxy putty.
I also got behind on the X sheet early on, and several ideas didn't get used (sunglasses, stars popping around,
http://www.youtube.com/watch?v=SpaDWebx6_c&feature=plcp
But like everything else, it got finished just in the nick of time. :)
Super-Duper website! I am loving it!! Will be back later to
read some more. I am bookmarking your feeds also
Post a Comment